Last modification: 2013-10-23 (previous version)
In this article I'm going to collect short descriptions about how to rapidly set up base stuff for Java web-application development. Please note that you don't have to install each application mentioned here, one item from every content's section (see below) will probably be enough. Also in some sections you can find tabs with different ways of installation, usually it's installation from repository and installation from tarballs. Repository way is much easier, but might require more traffic and disk space, and vice versa for tarballs. Please select tabs that are more appropriate for you.
Personally I use Debian Wheezy, but I also tested material for this article under Ubuntu 12.04 and 13.10. I have Oracle JDK installed, use easier "repository way" for Ant and Maven, and tarball way for Tomcat.
Content
- JDK:
- Building Tools:
- Web & Application Servers:
- IDE:
- DBMS:
- How to change default JVM
JDK installation
Before it's too late I'd like to say that if you can't answer the question "What is JDK?", you probably better start from Java SE and postpone Java EE stuff.
Which JDK to choose? I noticed that most developers (including me) prefer Oracle JDK over OpenJDK, but I can't provide hard evidence why it's better, in general they're pretty much the same. So it's your choice which one to use.
Oracle JDK Installation
Automated Oracle JDK 7 installation script for major Linux distributions is provided in my article Install Oracle JDK 7 in 3 simple steps.
OpenJDK Installation
To install OpenJDK 7 execute the command in terminal*:
sudo apt-get install openjdk-7-jdk
To check if openJDK was installed fine execute following command:
java -version
If everything is good you will see something like
java version "1.7.0_25"
OpenJDK Runtime Environment (IcedTea 2.3.10) (7u25-2.3.10-1ubuntu0.12.04.2)
OpenJDK 64-Bit Server VM (build 23.7-b01, mixed mode)
If installation finished without errors, but a different version of JVM is shown, after installing other tools open this simple guide to change it to openjdk-7 version.
* If you are not using Ubuntu, and you don't know who are sudoers, please execute commands here as super user (root). For this type `su -` in terminal, and input root's password, you should know it. When you are done here please don't use that terminal, just close it. As super user you can skip typing sudo.
Building tools installation
Which building tool to use? As for me Maven and Ant are pretty much different tools. Maven is easier and more convenient to use for typical projects, and it's not only building tool. Ant is more flexible and harder to use, I think it's possible to say that it's more low-level tool. Personally I worked with Ant first.
Ant Installation
To install Ant execute the following command in terminal:
sudo apt-get install ant
It might happen that Ant installation will rewrite your default Java version (you can check it executing `java -version` in terminal). If so, after installing other tools you can find a simple guide to change it back in the very end of this article.
You can download binaries from Apache's site. In this case you will download only about 5MB. And it will not rewrite default java version, but you will have to update Ant manually. Run terminal, change directory to where your downloaded tar.gz file is and execute following commands
# Don't forget to change version in the next 2 lines
sudo tar -xvzf apache-ant-1.9.2-bin.tar.gz -C /opt
sudo ln -s /opt/apache-ant-1.9.2/ /opt/ant
echo 'export ANT_HOME=/opt/ant' > /tmp/ant.sh
echo 'export PATH=$ANT_HOME/bin:$PATH' >> /tmp/ant.sh
sudo mv /tmp/ant.sh /etc/profile.d/
source /etc/profile.d/ant.sh
To check if Ant was installed successfully execute following command:
ant -version
You should see something like
Apache Ant(TM) version 1.9.2 compiled on July 8 2013
Maven Installation
To install Maven's package execute the following commands in terminal:
sudo apt-get install maven
It might happen that Maven installation will rewrite your default Java version (you can check it executing `java -version` in terminal). If so, after installing other tools you can find a simple guide to change it back in the very end of this article.
You have an option to download and install Maven from Apache's site. In this case you will download only about 5MB. And it will not rewrite default java version, but you will have to update it manually. For this download the latest Maven version from here as binary tar.gz.
Run terminal, change directory to where your downloaded tar.gz file is and execute following commands
# Don't forget to change version in the next 2 lines
sudo tar -xvzf apache-maven-3.1.1-bin.tar.gz -C /opt
sudo ln -s /opt/apache-maven-3.1.1/ /opt/maven
echo 'export PATH=/opt/maven/bin:$PATH' > /tmp/maven.sh
sudo mv /tmp/maven.sh /etc/profile.d/
source /etc/profile.d/maven.sh
Let's check if Maven was properly installed. Run in terminal
mvn -version
If everything's OK, you should see something like
Apache Maven 3.1.1 (0728685237757ffbf44136acec0402957f723d9a; 2013-09-17 08:22:22-0700)
Maven home: /opt/apache-maven-3.1.1
Java version: 1.7.0_40, vendor: Oracle Corporation
Java home: /usr/lib/jvm/jdk1.7.0_40/jre
Default locale: en_CA, platform encoding: UTF-8
OS name: "linux", version: "3.8.0-29-generic", arch: "amd64", family: "unix"
Server installation
While you don't use full stack of Java EE technologies (including EJB, JNDI, etc.), you may use containers like Tomcat or Jetty. They let you deploy web-applications that use JSP & Servlet API. Containers should work for you for most projects.
Tomcat Installation
To install Tomcat 7 from repository execute the following command in terminal:
sudo apt-get install tomcat7
It might happen that Tomcat installation will rewrite your default Java version (you can check it executing `java -version` in terminal). If so, after installing other tools you can find a simple guide to change it back in the very end of this article.
Download Tomcat from Apache's site. In this case you will download only about 8MB. And it will not rewrite default java version, but you will have to update Tomcat manually.
Run terminal, change directory to where your downloaded tar.gz file is and execute following commands (after the first sudo-wrapped command you can copy-past others at once).
# Don't forget to change version in the next 2 lines
sudo tar -xzf apache-tomcat-7.0.42.tar.gz -C /opt  # extract archieve
sudo ln -s /opt/apache-tomcat-7.0.42/ /opt/tomcat7 # create link for conveniece
sudo useradd -s /sbin/nologin tomcat7              # add user to run tomcat service
sudo chown -R tomcat7:tomcat7 /opt/tomcat7         # and give it ownership
sudo chown -R tomcat7:tomcat7 /opt/tomcat7/        # to tomcat's directory
cat > /tmp/tomcat7 << "EOF"
#!/bin/sh
### BEGIN INIT INFO
# Provides:          tomcat7
# Required-Start:    $local_fs $remote_fs $network $syslog
# Required-Stop:     $local_fs $remote_fs $network $syslog
# Default-Start:     2 3 4 5
# Default-Stop:      0 1 6
# Short-Description: Start/Stop Apache Tomcat 7
### END INIT INFO

TOMCAT_USER=tomcat7
TOMCAT_DIR=/opt/tomcat7

case "$1" in
start)
  echo "Starting Apache Tomcat 7..."
  su - $TOMCAT_USER -s /bin/bash -c "$TOMCAT_DIR/bin/startup.sh"
  exit $?
  ;;
stop)
  echo "Stopping Apache Tomcat 7..."
  su - $TOMCAT_USER -s /bin/bash -c "$TOMCAT_DIR/bin/shutdown.sh"
  exit $?
  ;;
restart)
  $0 stop
  $0 start
  exit $?
  ;;
*)
  echo "Usage: /etc/init.d/tomcat7 {start|stop|restart}"
  exit 1
  ;;
esac
exit 0
EOF
sudo mv /tmp/tomcat7 /etc/init.d/tomcat7           # register tomcat as service
sudo chmod 755 /etc/init.d/tomcat7                 # make it executable
sudo service tomcat7 start                         # run tomcat as service
sudo update-rc.d tomcat7 defaults                  # make tomcat run with system
Download Tomcat from Apache's site. In this case you will download only about 8MB. And it will not rewrite default java version, but you will have to update Tomcat manually.
Be aware that Eclipse doesn't support the 8th version at present, so you will have to deploy your applications manually.
Run terminal, change directory to where your downloaded tar.gz file is and execute following commands (after the first sudo-wrapped command you can copy-past others at once).
# Don't forget to change version in the next 2 lines
sudo tar -xzf apache-tomcat-8.0.0-RC5.tar.gz -C /opt  # extract archieve
sudo ln -s /opt/apache-tomcat-8.0.0-RC5/ /opt/tomcat8 # create link for conveniece
sudo useradd -s /sbin/nologin tomcat8                 # add user to run tomcat service
sudo chown -R tomcat8:tomcat8 /opt/tomcat8            # and give it ownership
sudo chown -R tomcat8:tomcat8 /opt/tomcat8/           # to tomcat's directory
cat > /tmp/tomcat8 << "EOF"
#!/bin/sh
### BEGIN INIT INFO
# Provides:          tomcat8
# Required-Start:    $local_fs $remote_fs $network $syslog
# Required-Stop:     $local_fs $remote_fs $network $syslog
# Default-Start:     2 3 4 5
# Default-Stop:      0 1 6
# Short-Description: Start/Stop Apache Tomcat 8
### END INIT INFO

TOMCAT_USER=tomcat8
TOMCAT_DIR=/opt/tomcat8

case "$1" in
start)
  echo "Starting Apache Tomcat 8..."
  su - $TOMCAT_USER -s /bin/bash -c "$TOMCAT_DIR/bin/startup.sh"
  exit $?
  ;;
stop)
  echo "Stopping Apache Tomcat 8..."
  su - $TOMCAT_USER -s /bin/bash -c "$TOMCAT_DIR/bin/shutdown.sh"
  exit $?
  ;;
restart)
  $0 stop
  $0 start
  exit $?
  ;;
*)
  echo "Usage: /etc/init.d/tomcat8 {start|stop|restart}"
  exit 1
  ;;
esac
exit 0
EOF
sudo mv /tmp/tomcat8 /etc/init.d/tomcat8              # register tomcat as service
sudo chmod 755 /etc/init.d/tomcat8                    # make it executable
sudo service tomcat8 start                            # run tomcat as service
sudo update-rc.d tomcat8 defaults                     # make tomcat run with system
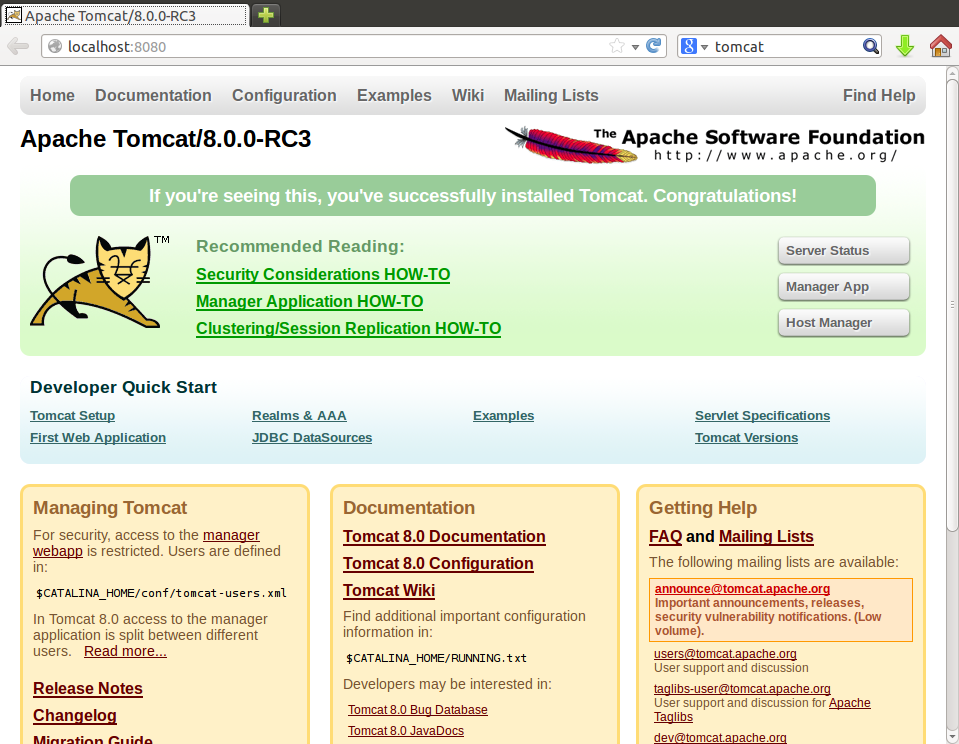
To check if Tomcat was installed correctly launch your web browser and visit address
http://localhost:8080/. If everything is fine you will see page like a following:
Now tomcat is a daemon in your system and will start up with every loading of your system. You can stop it, start it and restart it executing following commands (change tomcat7 to tomcat8 if you installed the 8th version)
sudo service tomcat7 stop
sudo service tomcat7 start
sudo service tomcat7 restart
JBoss AS and Wildfly Installation
I wrote two articles about automatical installation of these two application servers. The only two things you need to do is to execute two commands (to download and to run script that installs application server). Follow one of these links:
Be aware that Wildfly is just a new name for JBoss AS starting from version 8.Eclipse Installation
- Download Eclipse from the official Eclipse's website. Choose "Eclipse IDE for Java EE Developers" edition instead of "Eclipse IDE for Java Developers" because the last one is just for Java SE and isn't very suitable for creation web-applications.
- Uncompress downloaded archive into folder you are used to use as folder for user-installed applications.
Run terminal, change directory to where your downloaded tar.gz file is and execute the following commands
sudo tar -xvzf eclipse-jee-<version>-linux-gtk.tar.gz -C /opt
sudo mv /opt/eclipse /opt/eclipse-jee
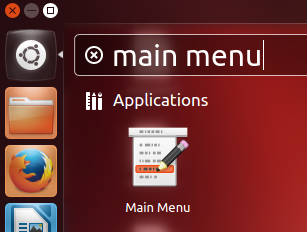
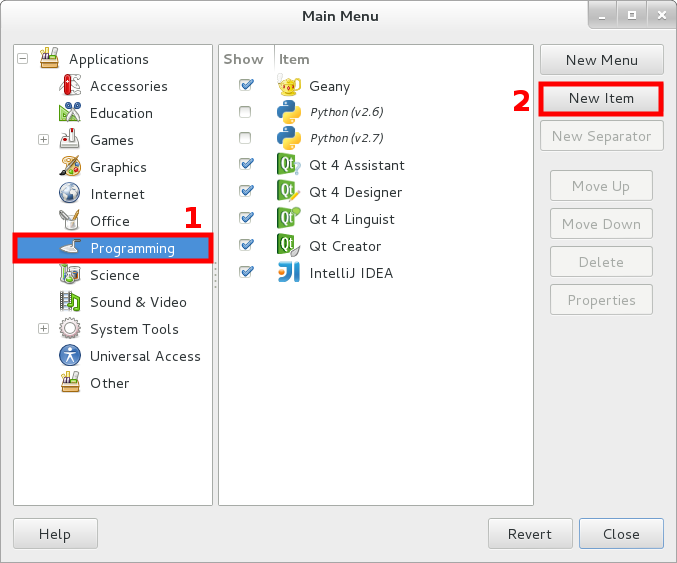
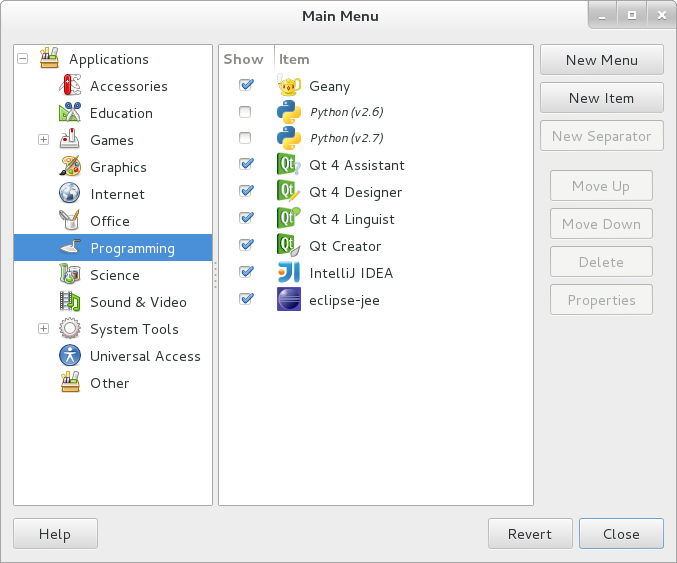
- Add a link to Eclipse in your Applications menu:
- For some reason Ubuntu doesn't have Main Menu editor nowadays by default.
So I recommend to install it. It will help you to add your own launchers to main menu.
sudo apt-get install alacarte
- Menu ⇒ Main Menu. You can launch menu pressing Win key in both Gnome 3 (Debian) and Unity (Ubuntu).
- Programming ⇒ New Item
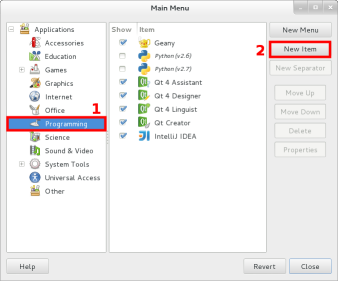
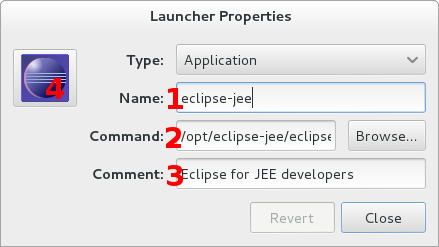
- Fill the fields like this:
Name: eclipse-jee
Command: /opt/eclipse-jee/eclipse
Comment: Eclipse IDE for Java EE Developers
Icon (press at the button): /opt/eclipse-jee/icon.xpm
and press Close; - Eclipse item should have appeared in your menu. Press 'Close' button to close Main Menu editing dialog.

- For some reason I had to reboot machine after adding this launcher using alacarte in Ubuntu before it appeared. Maybe you too.
- For some reason Ubuntu doesn't have Main Menu editor nowadays by default.
So I recommend to install it. It will help you to add your own launchers to main menu.
- Run Eclipse and check if you're able to run a simple java application (Hello world, for example)
Tomcat integration with Eclipse
- Run Eclipse. Add Tomcat server into a workspace doing following:
File ⇒ New ⇒ Other... ⇒ Servers ⇒ Server ⇒ Next >
- Choose
Apache ⇒ Tomcat v7.0 Server
and click 'Next >' - Set Tomcat Installation Directory: /opt/tomcat7 (or /opt/tomcat8, or /usr/share/tomcat7 if installed from repo)
- Click Finish. I had some 'permission denied' error, but after pressing Finish button again everything became good. If installed from repo, you will have error related with missed config files instead. The same trick with pressing Finish one more time should work.
- Copy configurations in order to avoid that 'permission denied' or 'missed config file' problems: *
# replace /opt/tomcat7/conf/ with /etc/tomcat7 if Tomcat was installed from repo
sudo cp -r /opt/tomcat7/conf/* \
~/workspace/Servers/Tomcat\ v7.0\ Server\ at\ localhost-config/
sudo chown -R $USER:$USER ~/workspace/Servers/Tomcat\ v7.0\ Server\ at\ localhost-config/
Take into account that Tomcat configurations in Eclipse and in /opt/tomcat7/ are different now. - If you installed Tomcat from repository, please concat policy files into one file, otherwise Eclipse will complain:
cd ~/workspace/Servers/Tomcat\ v7.0\ Server\ at\ localhost-config/
cat policy.d/* > catalina.policy
- Start server involving context menu of Tomcat in Servers tab (from the bottom Eclipse's panel) and clicking Start.
If everything is good you'll see several lines in your Console tab after this action with only INFO and maybe WARN levels. If you got errors try to refresh Server first, selecting it in left panel and pressing F5 button. - In case if your 8080 port is occupied with some application (like JBoss, Glassfish, another Tomcat, etc.) you need to replace all references to 8080, 8005, 8009 ports with some another unoccupied ones (for instance 9090, 9005, 9009). Do this by changing file Servers/Tomcat v7.0 Server at localhost-config/server.xml in the following way:
Execute command: *
cd ~/workspace/Servers/Tomcat\ v7.0\ Server\ at\ localhost-config/
gedit server.xml
and use replace (Ctrl+H) to change ports. After this restart Eclipse. - Open your favourite browser, type http://localhost:9090/ and press Enter.
Error 404 is a good sign :) - Additionally you can create Dynamic web-application for checking purpose, but hardly does it concern installation topic, so I won't describe it here.
* My workspace is ~/workspace/ folder, change commands if your one differs.
MySQL
While it's hard to imagine development of Java web-application without JDK, server, and friendly some building tool, it's quite possible not to have relational database. But it's easy enough to install MySQL. Decide if you need it now.
To install MySQL execute the command:
sudo apt-get install mysql-server
and input a password for MySQL's root user.
To check if MySQL server was installed fine run the command:
mysql -uroot -p
and enter password for your root account. Then you should see mysql> prompt. Type quit to exit from it.
How to change default JVM
Fortunately there's a script that can change your default JVM. You can download and run this script executing commands:
wget http://webupd8.googlecode.com/files/update-java-0.5b
chmod +x update-java-0.5b
sudo ./update-java-0.5b
It should open dialog where you can select version of JVM that you want to be your default one.
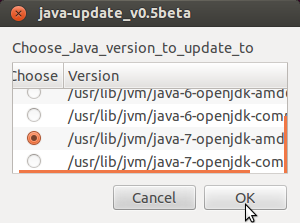
Press OK, and check that your default JVM has been changed:
java -version
Comments